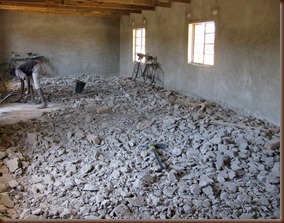
 As with everything in Africa, it seems noting goes according to plan, so it is pointless to even make a plan…hehe. Most of you know that we started building the school back in April/May when I first arrived here in Zambia. In theory, the building should have been finished in June when the team came to put on the roof; however, we had many struggles with our builder. The original builder did an awful job leveling the window frames, the floors, and the plastering on the walls…in addition to a continuous lack of presence at the site. Since his work was not up to par, we had to tear out all the windows and the floor and hire another builder to fix everything. Thankfully God allowed a qualified builder to come and make time to fix everything and make it the way it should be. Lomi has been working hard the past couple weeks trying to renovate the school building preparing it for paint and usability.
 One afternoon while he and his men were working, a small tornado came through and ripped off half the school roof. The wind took the roof and flipped it over onto the back half of the roof, as if turning the page of a book. When we got back from town, we couldn’t believe our eyes. After spending several days and nights up on that roof leveling it, securing it, it was all we could do to keep form getting discouraged. With everything else going on around camp, we thought it best to hire Lomi to fix it. Well he thought it would be possible to get men from the community together to lift up the roof and flip it back over and then secure it with wire. Willing to try anything, we gather men from the community and the wench on the Land Rover and headed up to the school house. After several tried, we realized the roof was just to heavy and that wouldn’t work. Thankfully God already had a plan…in that moment, the men in the community offered to get together the following Monday to fix the roof for us. Praise God!!
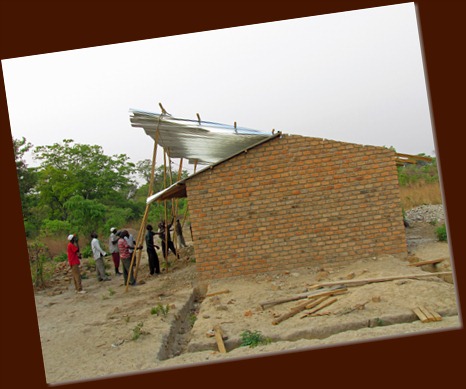
Praise God that the community it uniting for their children's sake and giving of their time and talents for the project. They started fixing it this past Monday and hope to have all the roof sheets nailed back on by the end of Wednesday. Lomi plans to then start the floor on Thursday and by Friday, Lord willing, the school house will be complete, ready for a front door :o)
 Once the school building is complete, the classroom needs to be filled with shelves and educational toys. We have had several donations from the teams and others that God has sent us over the summer, and hopefully still more to come! Our library is full of art supplies, musical instruments, math cubes, glue, pencils, crayons, and more for the children once the school opens. A good classroom always has shelves to put all these educational tools out on display for the children…so for most of the month, we have been working very hard and making that happen.
Easily I had a vision of small shelves, book shelves, tables, cubbies, a stage, and even a grass hut kitchen, but I never dreamed the process would include so many steps. I want to share this process with you, not that you will sympathize with all the hard work that went into this furniture, however, that you will appreciate how easy it would be for you where you are!!!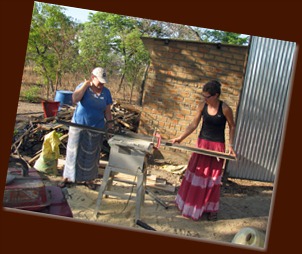
Here it goes…
Step 1: Buy 24 planks of wood
Step 2: Have the wood transported 2 hours into the bush
Step 3: Plane each piece of lumber (5 meters long) to the same size (20 mm)
Step 4: Cut each plank down in smaller pieces for the various shelves
Step 5: Take the cut pieces and run them through the table saw to make the sides relatively straight
Step 6: Glue two planks together to make them wide enough for shelves/cubbies
Step 7: Wait 1-2 hours and glue more planks together
Step 8: Cut the glued planks to the correct width (so that all pieces are equal size)
Step 9: Run them through the planer again (since all have bowed)
Step 10: Cut each piece to the correct length
Step 11: Using the router, prepare all edges and shelves to be attached
Step 12: Drill holes through the wood
Step 13: Screw the screws in
Step 14: Fix anything that broke or didn’t work
Step 15: Admire the finished piece of furniture
Step 16: Repeat steps 3-15 for every piece of furniture
 As you can see, this project is keeping us quite busy! We have finished all the shelves for the school and two of the art tables. We still have two more work tables to build, a sensory table, a grass hut kitchen, and a stage. Then we need to sand them and varnish them before they will be ready for use at the school!! If you are free in the next couple of weeks, please come on out and help…hehe!! Please pray that we are able to invite men/women from the community to help in this endeavor and to continue our relationships with them, building them up to better their own community being Christ to one another!

No comments:
Post a Comment